All the Tea

Afternoon tea. Quite possibly, the most perfect collection of savory and sweet finger foods, lovingly paired with hot tea (and now, bubbly!). I took a trip across the pond and all I have to show for it are all these tea towels! I would believe that England is now sadly bereft of tea towels, as I have purchased all of them. In all seriousness, though, traveling is such an important part of building character and I was lucky enough to take my 17 year old daughter out of the country for the first time last month. We went with a program at the school I’m attending to obtain my MBA. I extended the trip so we could really delve into the culture and, boy, did we ever!

Gluten free afternoon tea @ The Park Lane Grosvenor in London.
The Park Lane Grosvenor @ Hyde Park: The absolute best gluten free scones in all of London – with the most adorable travel companion a mother could ask for!

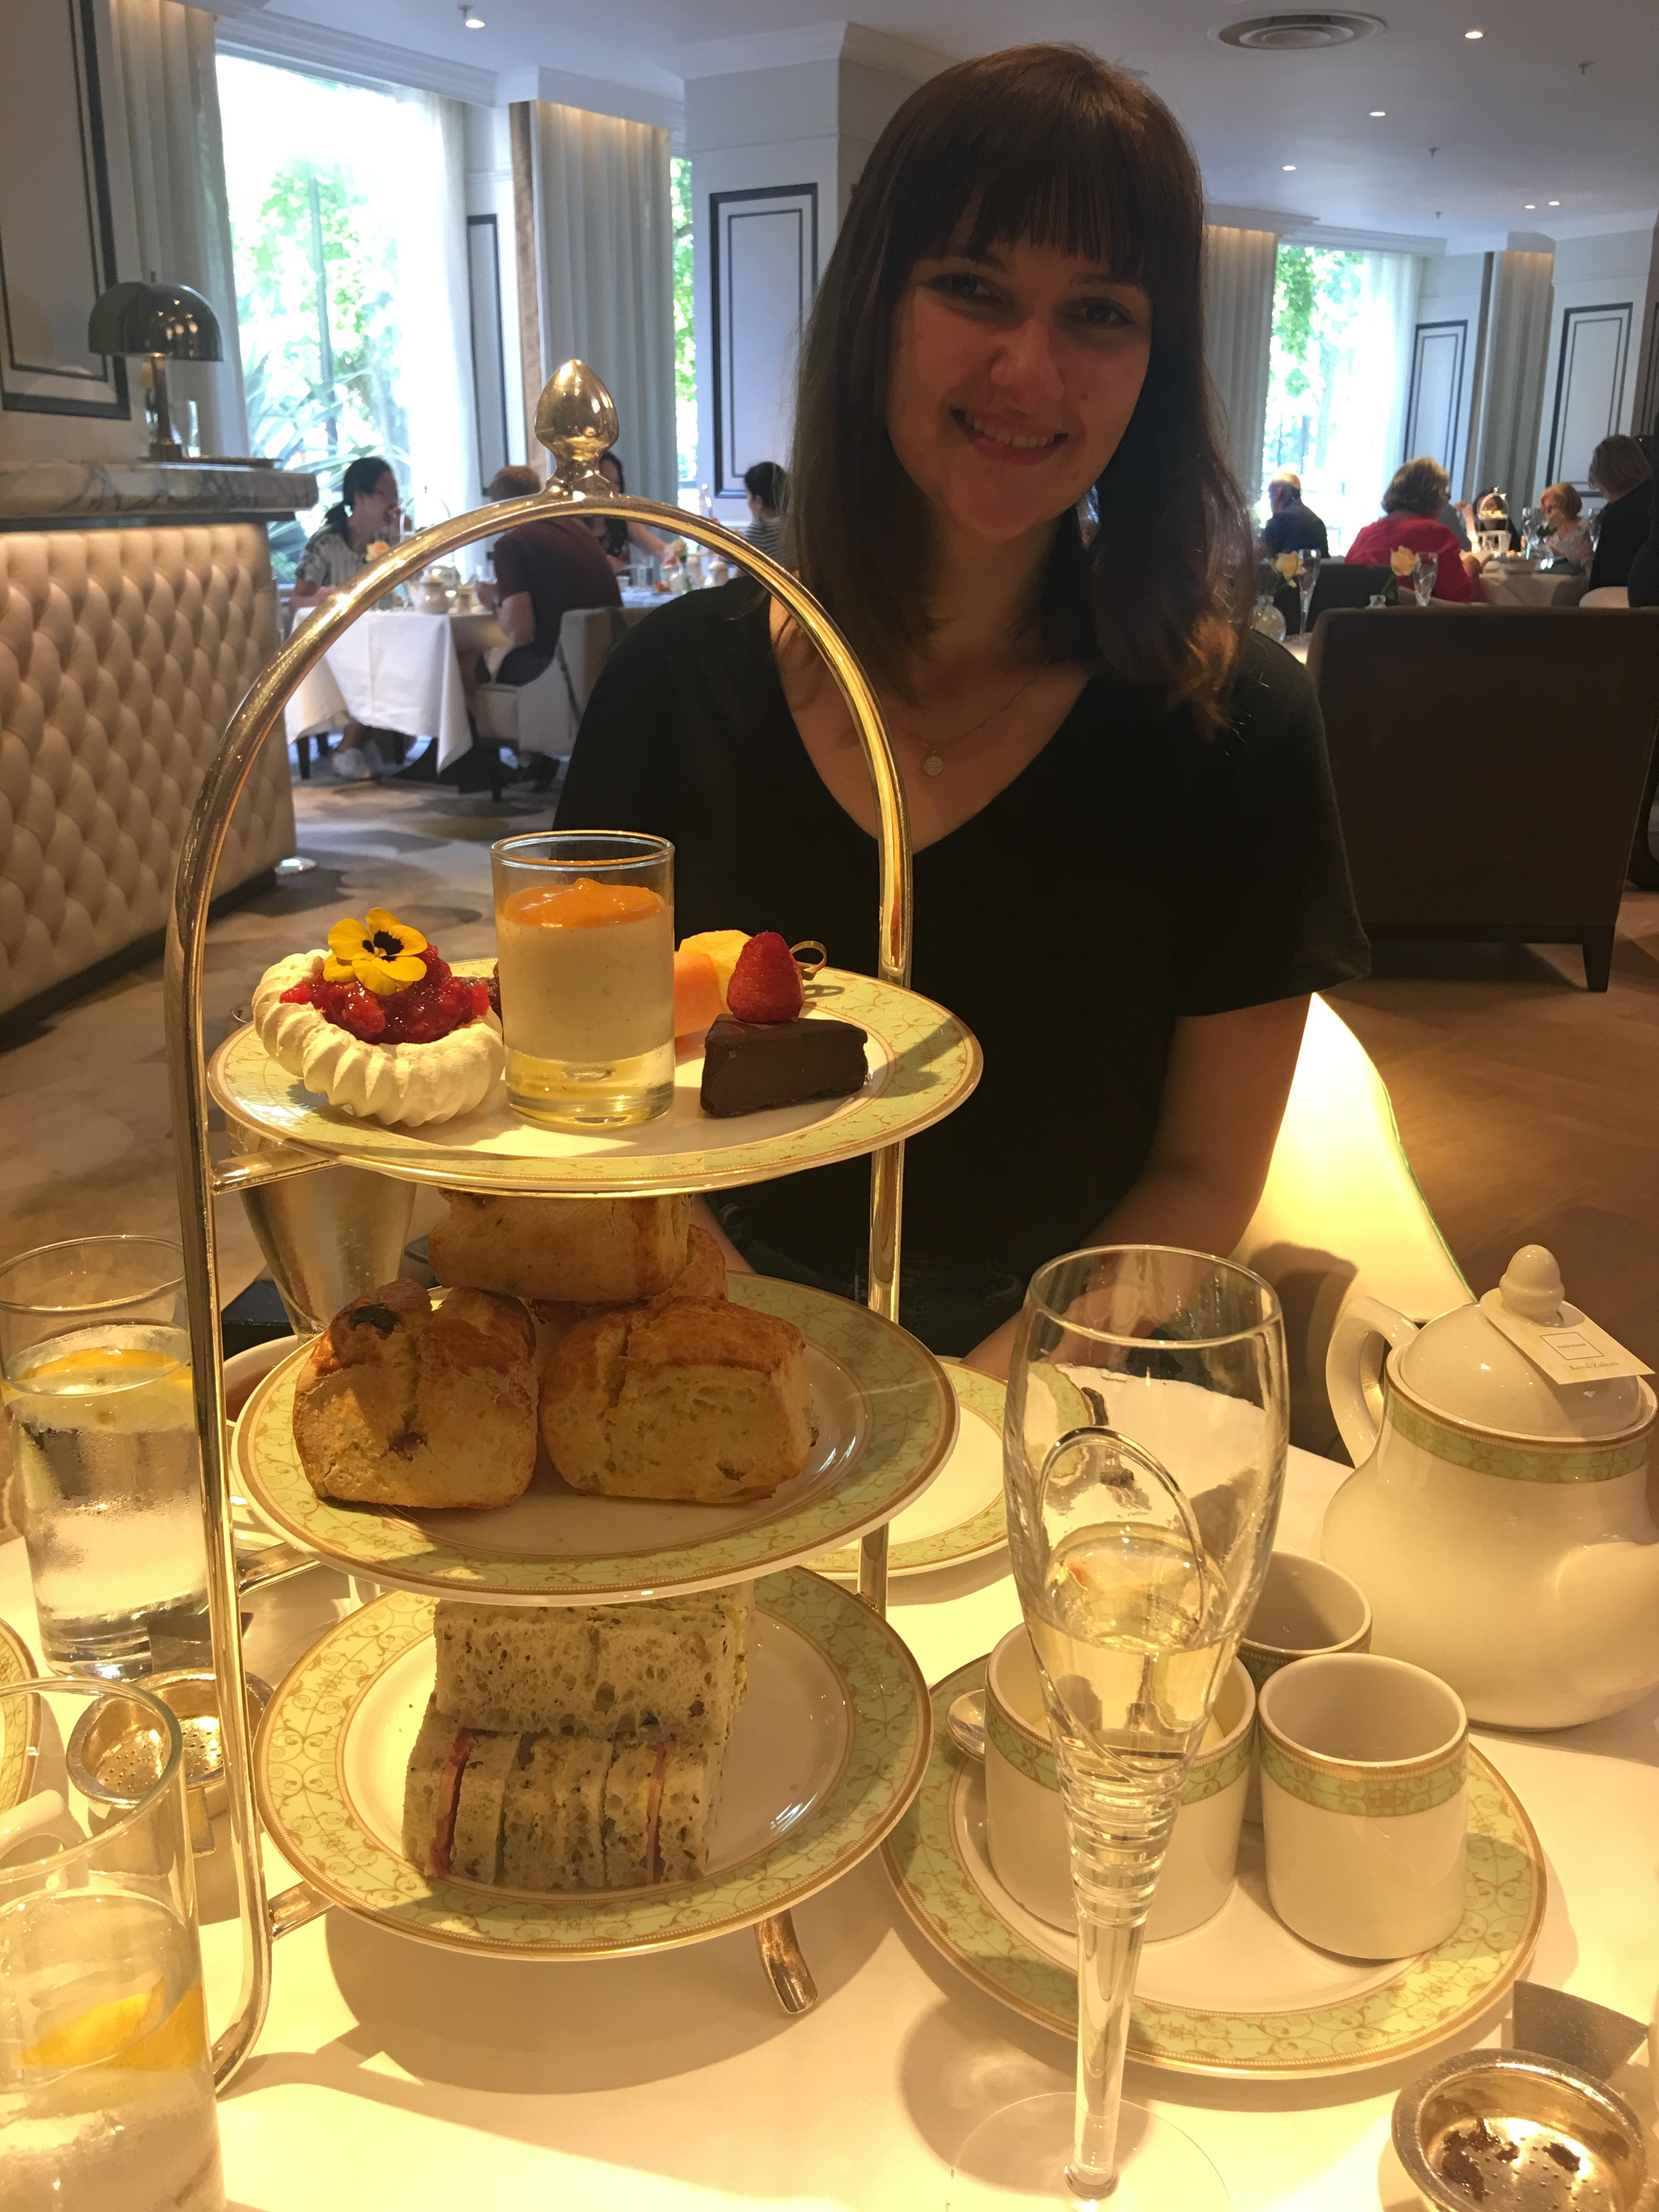
I went off the keto diet for the trip, but researched and reserved several (six, to be precise) gluten free afternoon teas to enjoy over the course of the two and a half weeks that we were there. I had plateaued with my weight loss a few weeks before I left and had resigned myself to the fact that I would need to start exercising after we returned from our trip. I’ll get into the details of the truly excellent teas we partook in, but first, I need to share my weight loss experience on keto.

I started on March 20th and by June 20th I was down 30 pounds and holding steady. I figured I’d go off keto for the trip, likely gain some of the weight back, and hit it hard when I got back. Turns out – I actually lost weight on vacation! After eating what some would deem too many tea sandwiches, scones and fries nearly every day, I was down five pounds when I got home. Not only that, but when I went back on keto, I started dropping pounds like I did in the beginning. What I learned is how to break a plateau.

I will still get on an exercise regime because it’s better for my body to do so and I want to avoid those frustrating plateaus. But, going back on carbs (I’ve heard this is called carb cycling?) for a little, can pop the body out of a plateau. The key is the exercise. We were walking 10 miles a day; which for me, is a huge increase from my sedentary standard of sitting at my desk all day, every day.

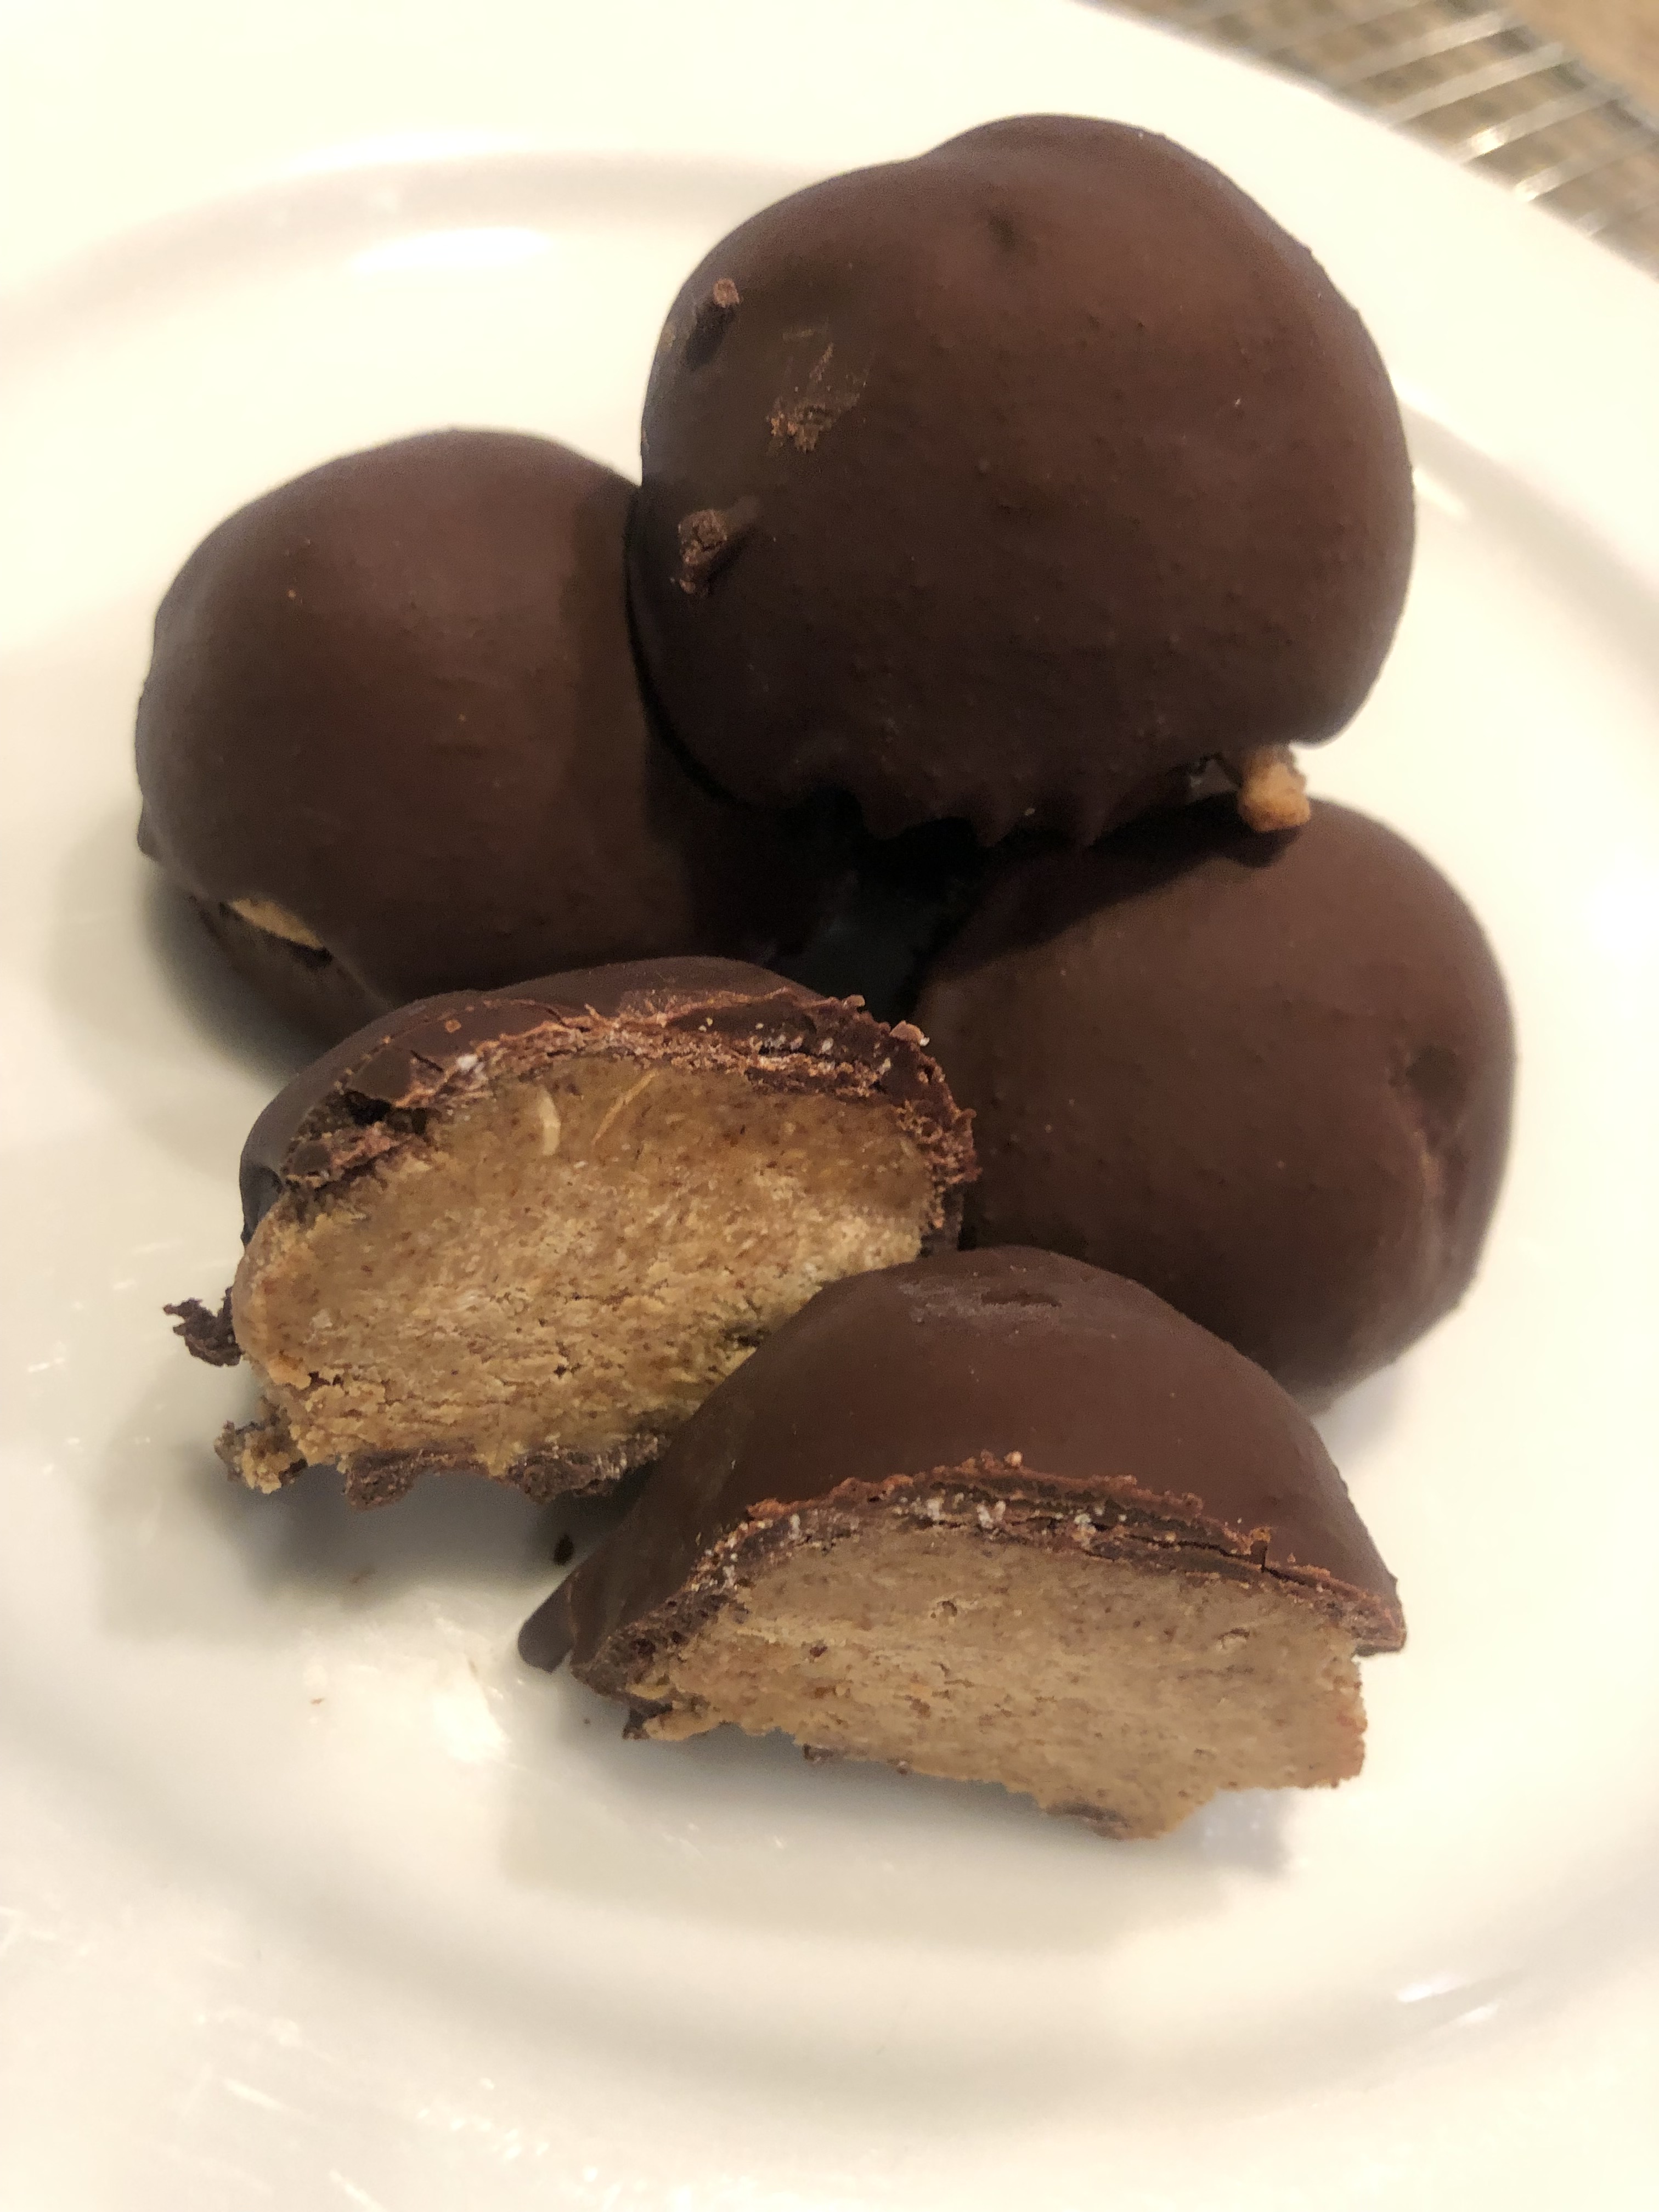
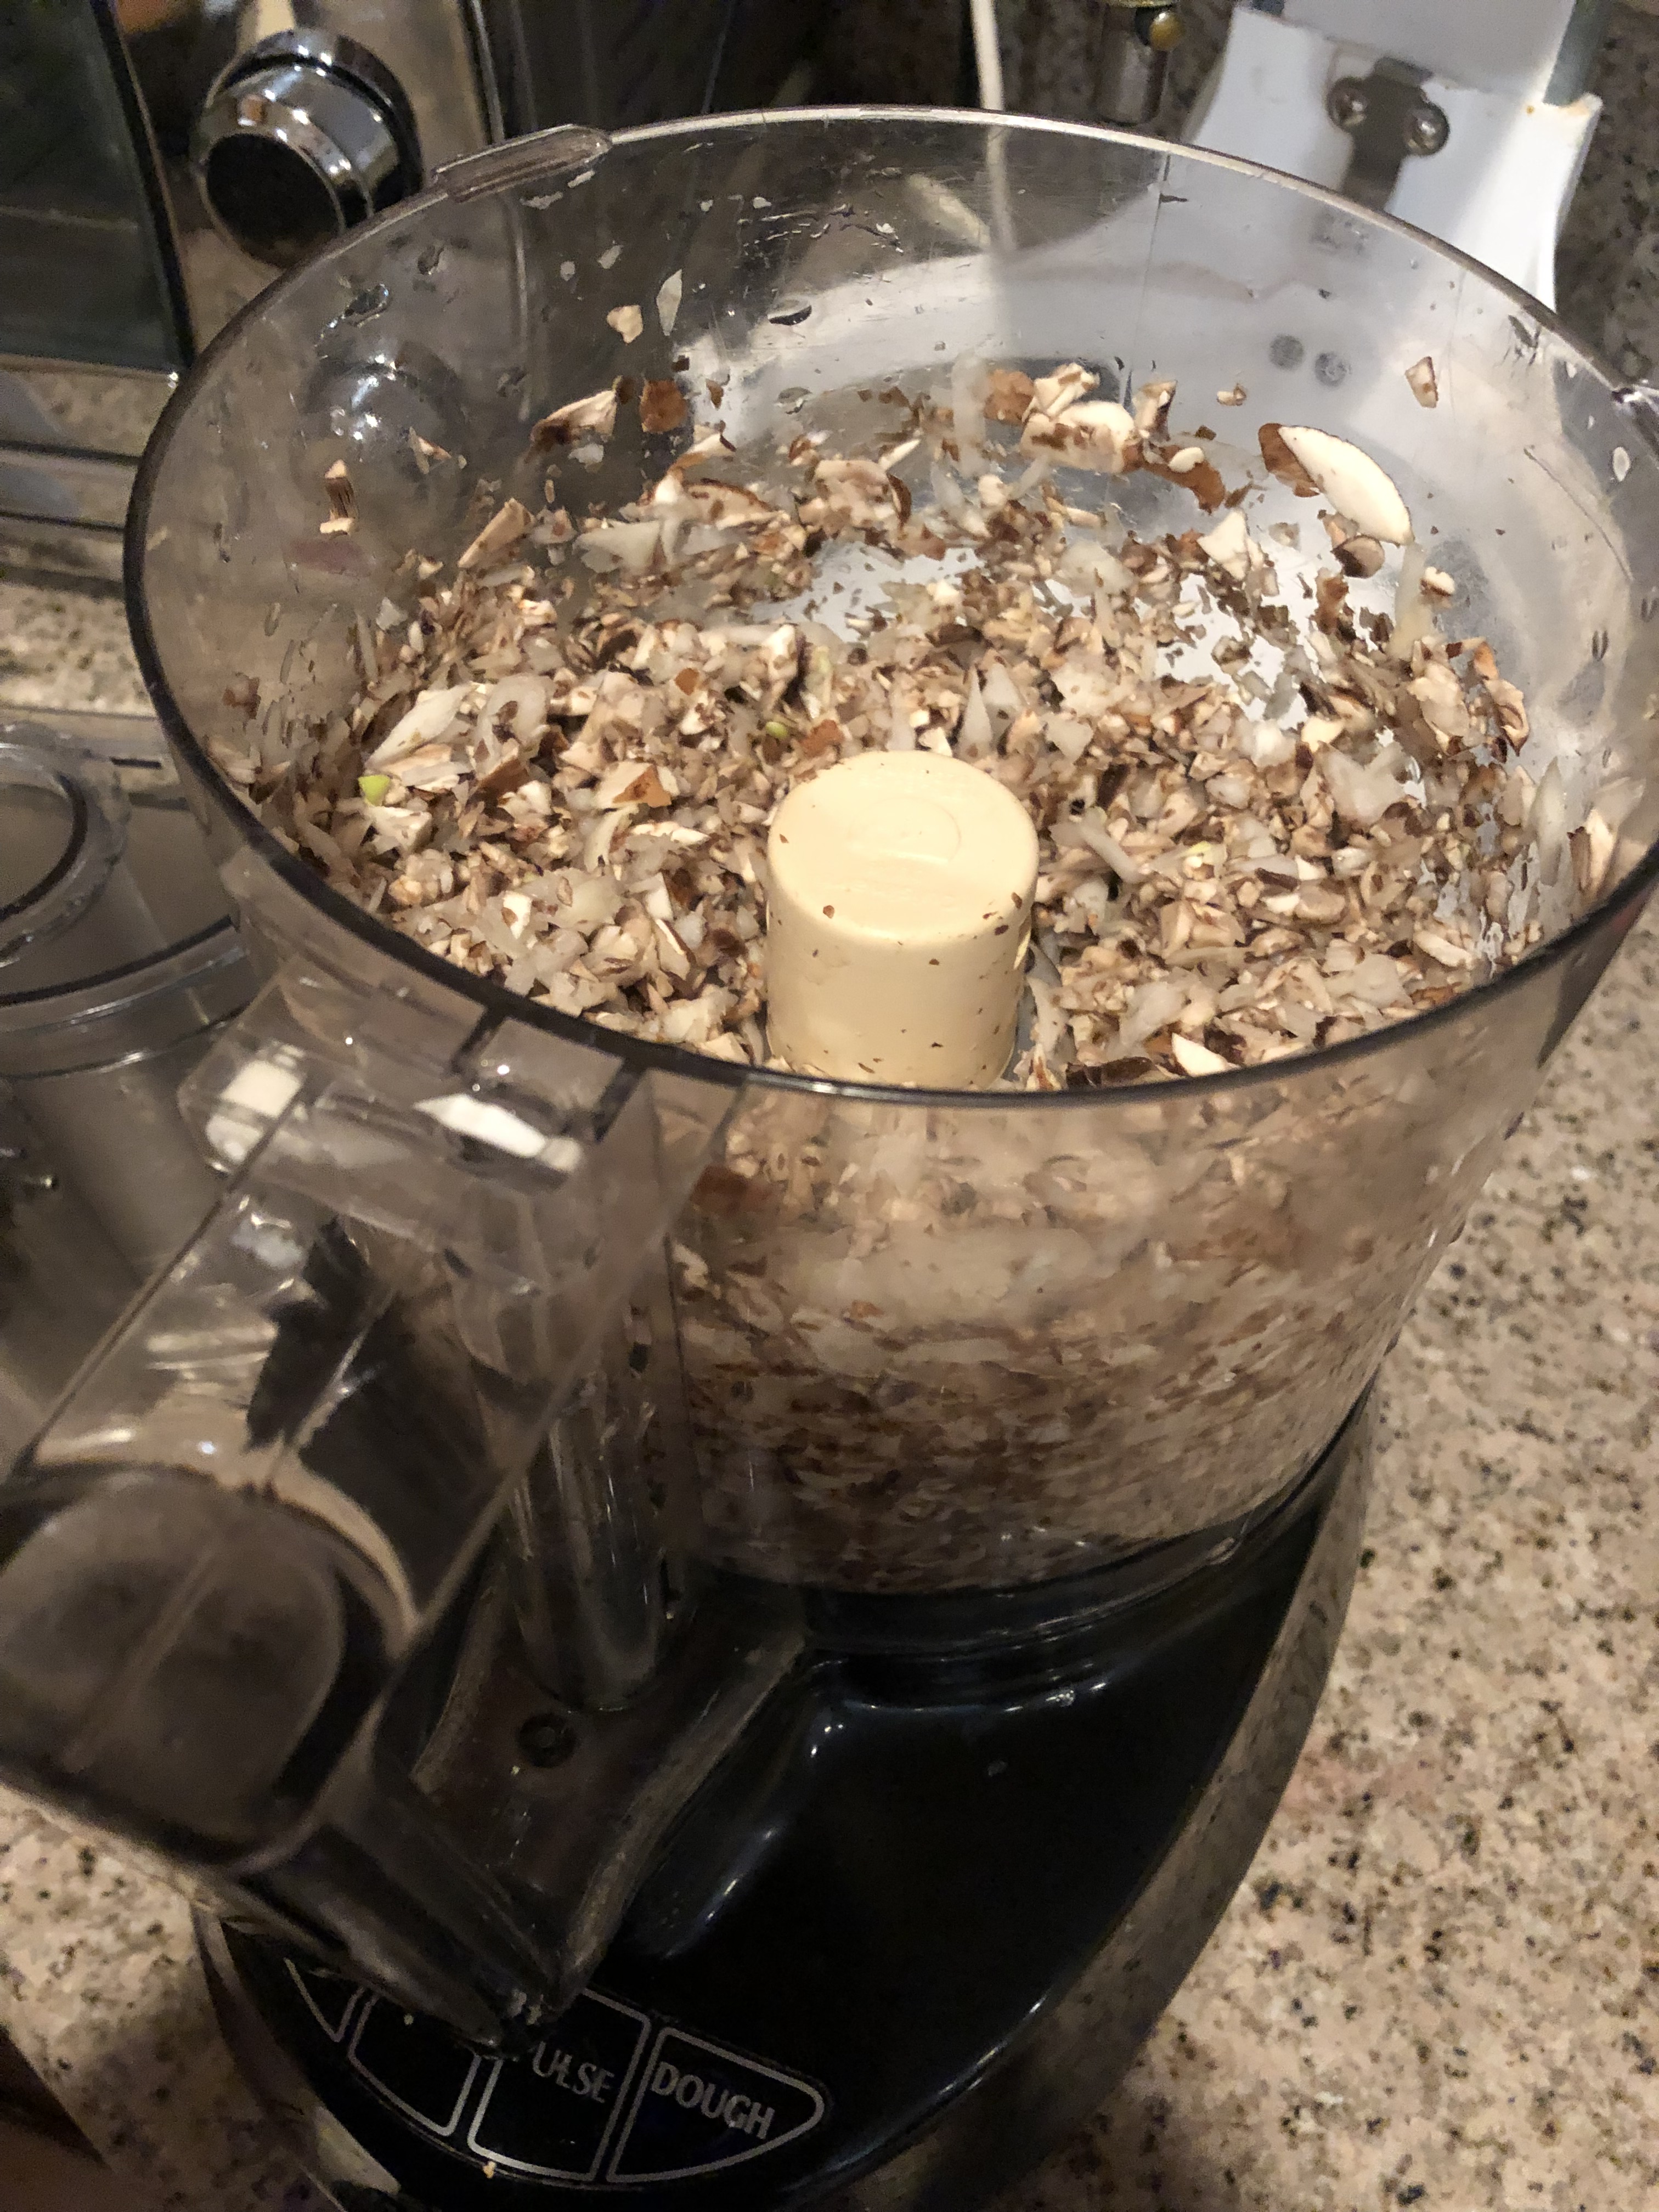
So, I’m back! I have some great new keto recipes to share with you and I’m raring to get back on blogging and tweeting to build my online community! Please follow me on Twitter to lean more about going sugar free and grain free. If I can do it, so can you!

Keto Chocolate Ice Cream!

It’s the weekend! It’s going to be a hot one where I am and I can’t wait to dig into this rich, chocolate ice cream. One thing I’ve learned about cooking without sugar, is that the recipes aren’t always a straight adaptation of replacing the sugar with a low carb sweetener. Sugar behaves a certain way on a molecular level that is very difficult to emulate.

This recipe is different than my conventional (full sugar) recipe in that it doesn’t have egg yolks in it. The secret to good conventional ice cream are the yolks. They bind with the sugar and create a smooth, soft texture. This recipe is very different because it doesn’t have eggs, but it’s every bit as delicious AND it’s low carb.

For more yummy, low carb frozen treats, try my Keto Peppermint Chocolate Ice Cream, or my Orange Chocolate Ice Cream Sandwiches!

Ingredents:

  • 16 oz full fat coconut milk
  • 3 T cocoa
  • 1/2 c Allulose
  • pinch of salt
  • 1 t psyllium husk
  • 2 c heavy cream
  • 1 t vanilla
  • 2 oz unsweetened chocolate

Procedure:

  1. Cook the coconut milk, sweetener, cocoa and salt over medium low heat until the dry ingredients are dissolved.
  2. Stir in the psyllium husk and allow it to cook into the mixture for 2-3 minutes.
  3. Remove from heat and cool in the fridge.
  4. Whip the cream with the vanilla.
  5. Fold the chocolate mixture into the whipped cream.
  6. Freeze in an ice cream maker and/or place directly in an airtight container and into the freezer.
  7. Enjoy!

Please follow my Twitter feed for more recipes

Sugar Free Me!

It’s hard to put yourself out there. There are so many things that can stand in your way. For me, I am insecure about my weight. I have been a successful chef for many years and when I discovered I have an intolerance to gluten, I thought my life as a chef was over. Over the years I have become an expert on gluten free and organic diets because it’s what I cook for myself, my friends and my family.

Mastering gluten free baking is no easy feat! However, recently, I was inspired by a friend to give up sugar and go keto. I did this because of some health conditions I suffer from, namely from a childhood nerve injury, but the weight loss that comes with the keto diet is a pretty favorable side affect. I’ve struggled with body image my whole life (who doesn’t?) and when I tell people I’m a healthy lifestyle chef, some of the reactions are less than kind.

I believe people can be healthy at any size; I was healthy when I started keto three months ago and was 30 pounds heavier than I am today. My blood work and heart were healthy, I worked out, but I didn’t (and still don’t) have the physique that most people would consider healthy. Giving up sugar was the final connection for me. I had to disconnect the idea that I am what I look like. There’s much more to it than it sounds like, but that’s what it took to create this blog and put myself out there.

No regrets! As a chef, I’m able to create and identify awesome keto friendly recipes that help me feel like I am not missing out. It’s scary to be this vulnerable, but I’m inviting you to follow my journey because I want to inspire others to push themselves to be come their best selves. You don’t have to do anything but follow me here or on Twitter!

Taco Time

It’s fast, easy and delicious. Who doesn’t love a good taco salad? Rarely does a week go by that I don’t make some form of Mexican food. But, since starting the keto diet, I have steered relatively clear of it, mainly because I’m afraid of the chips… It such a reflex to snack on those crispy little bits of heaven. But, Mexican food is one of the simpler types of cuisine you can really easily make (or order) without too many carbs.

No beans, no rice no tortillas (including chips). That’s all you have to remember. Literally everything else is fair game (ok, maybe not corn or pozole), but you get my meaning. My favorite healthy thing to order at a Mexican restaurant is taco salad. Come to think of it, taco salad is also one of the easiest meals to prepare at home, too.

There are a few little tricks to make this a weekly meal, but the only ingredient that some people may not have in their cupboard is ground chili. It’s one of those ‘secret’ ingredients professional chefs always seem to keep in stock, but don’t think about. The thing about ground chilis is they aren’t always blow-your-head-off spicy.

I prefer New Mexico chili for my taco seasoning. All that’s in the store bought chili powders is chili and garlic. By adding raw garlic and onion to the cooking meat, the only missing piece is the ground chili (and salt, of course). This taco meat can be used in anything, and it’s so simple, you don’t even need to look at a seasoning packet’s ingrediet list to know this is better for you and you won’t be able to tell the difference. I promise.

Ingredients:

  • 1 T oil of your choice (I prefer this coconut sunflower blend)
  • 1 lb ground beef
  • 1 onion, chopped small dice
  • 2 cloves of garlic, minced
  • 1 c grated sharp cheddar cheese
  • 2 heads of baby romaine, chopped
  • 4 T sour cream
  • 8 T salsa
  • 1 tomato, chopped, medium dice
  • 1 avocado, cubed
  • 1, 2″ chuck of cucumber, chopped, small dice
  • 2 green onions, sliced fine

Procedure:

  1. Heat a large cast iron skillet over medium high heat.
  2. Add the oil and allow to heat until shimmering.
  3. add the onion and toss in the oil until coated.
  4. Cook for 2-3 minutes and add the garlic.
  5. Cook for 1-2 minutes more and add the meat.
  6. Add the ground chili.
  7. Continue to cook while stirring the meat, onion and garlic for another 6-10 minutes until the meat is cooked through and begins to brown.
  8. Divide among 3-4 plates.
  9. Add the cooked meat on top of the lettuce and quickly add the grated cheese to get it melting.
  10. Top with salsa, sour cream and avocado.
  11. Garnish with tomato, cucumber and green onion.

Once you know how to make a good taco meat without the seasoning packets with who-knows-what in them, this will be a go-to weekly meal. Tell me what you think in the comments below and follow me on Twitter for more recipes.

Burger Time!

Warm weather is finally here and that means it’s barbecue time! Burgers are a weekly meal at my house and now that it’s grill weather, my kitchen will stay clean while I make my favorite bacon avocado cheeseburgers! I’ve got some professional tips to help make your burgers the best they can be, so read on!

As I mention in my tritip blog, my favorite outdoor cooking method is over wood or charcoal, but a gas grill works just fine for these bad boys. Actually, the most common way I prepare these is on cast iron, especially when i’m in a hurry. That’s why I’d opt for the gas grill during the week.

As for the meat itself, I recommend using 15% fat ground beef, fat provides flavor. Here’s the trick: when forming the patties slap the surface of the burger hard enough to sting a little. This helps the fat bond to itself and form a thin surface layer, helping keep the burger’s shape intact: no shrinkage. How many of us have formed perfect patties and once they hit the heat they ball up like a tennis ball? You’re not alone. I flatten them out and smack ’em from hand to hand to get the right shape.

Ingredients:

  • 1 lb ground beef, divided into 4 balls and flattened into patties (use the slapping method from above)
  • 2 T grill mix seasoning from my steak blog
  • 1 ea avocado, sliced
  • 4 pc cooked bacon, halved
  • 8 slices of sharp cheddar cheese
  • 8 leaves of romaine lettuce
  • 1 ea tomato, sliced
  • mayo/mustard to taste

Procedure:

  1. Turn on the gas grill on high and allow to heat up (10 minutes).
  2. While the grill heats up, prepare your burger patties, grill mix and fixins.
  3. Turn the grill down to medium-high.
  4. Sprinkle grill mix on one side of each burger, please that side down on the grill.
  5. Allow to cook for 2-3 minutes, 1/4 turn to achieve nice grill marks.
  6. Season the raw side of the burger and flip after another minute.
  7. Add the avocado slices, bacon and cheese to melt the toppings onto the burger.
  8. If you’re a bread eater, now’s the time to brush with butter and toast on the top shelf of the grill…
  9. close the lid and cook for 3-5 more minutes and remove from the heat.
  10. Serve on lettuce with tomato, mayo and mustard.

I hope you enjoy this favorite of mine. Please make a comment and follow me on Twitter for more recipes!

Keto Almond Coconut Bombs

Reduced appetite is one of the many benefits of the Keto Diet. With these little protein packed fat bombs, you can easily replace a meal and enjoy a delicious treat while you’re at it. Having tasted several different sweeteners, I decided to powder some Erythritol in one of my favorite kitchen appliances: my Vita-mix.

I recently discovered that there’s a Vita-mix factory and distribution center right up the road from where I live (*fan girl moment*). I didn’t have any powdered sugar replacer, so I ran 3/4 of a cup through the old power blender; worked like a charm. Be forewarned, there’s some superfine powder created that looks a lot like smoke… In fact, I ran it for less than 30 seconds on high and my hand got hot holding the lid on. So, be careful to not start a fire.

To diffuse the powdery smoke-like cloud, I left the lid on and placed the whole container near the vent fan switched on high. After 10 minutes, the dust settled, making the powdered Erythritol a perfect consistency. I dumped it on a sheet of parchment and slid it into a jar for safe keeping and used some for this recipe. I do detect some graininess in the chocolate coating, but I feel it really adds to this dish.

Perfect Keto Almond Coconut Bombs

Ingredients:

  • 14 oz organic almond butter at room temperature
  • 4-5 T powdered Erythritol
  • 1/2 c unsweetened, toasted coconut
  • 1 t vanilla extract
  • 1 1/2 oz unsweetened chocolate
  • 3 T coconut oil
  • 4 T Powdered Erythritol

Procedures:

  1. In the bowl of a mixer with the paddle attachment, beat the almond butter until smooth.
  2. Add the powdered sweetener and mix to blend.
  3. Add the toasted coconut and mix to blend.
  4. Scoop the mixture on to a baking sheet covered with parchment or a slip at.
  5. Place the tray in the freezer overnight.
  6. Remove the tray from the freezer and roll the scoops into balls, refreeze until the next steps are complete
  7. Melt chocolate and coconut oil in a thick bottomed pan being careful not to burn the chocolate.
  8. Whisk in the sweetener.
  9. Dip the almond coconut balls into the chocolate and chill until firm.
  10. Keep in the freezer in a sealed container.

Please share your favorite meal replacement or snack. Follow me on Twitter for more awesome recipes!

Kale Yeah!

Regardless of your diet, your body needs the nutrients that come from vegetables. The keto diet limits the options, somewhat, due to the high carbohydrate content of vegetables that grow below the ground – like potatoes, etc. Don’t underestimate the power of dark leafy greens! Literally every system in the body benefits from these lush, mineral rich vegetables, so the more you incorporate them to your daily meals, the better.

My go-to leafy green is kale. Not only is it among the most nutrient dense food on the planet, but it tastes great. Whether roasted to a chip, sauteed or served raw in a salad, kale is delicious when prepared properly. There are so many different varieties to chose from that you’re bound to find one that suits your fancy.

Kale may get a bad rap from critics of the healthy eaters out there, it’s become synonymous with fad diets and hippies. I’m proud to defend its honor, after years of being sidelined under a slice of orange on diner plates and stuffed into salad bars to hide unsightly ice, we have finally recognized the myriad of benefits this cruciferous vegetable (literally) beings to the table.

Just a quick shot of some sauteed kale that was part of dinner last night.

Sauteed Kale with Bacon & Mushrooms

Ingredients:

  • 1 bunch of curly kale, washed, dried and ribs removed
  • 2 slices of bacon, chopped into small pieces
  • 1/2 onion, chopped medium dice
  • 1 clove garlic, minced
  • 10 brown (crimini) mushrooms, sliced
  • 1 T tamari sauce
  • 2 T chicken broth
  • juice of 1/2 lemon (optional)
  • 2 t balsamic vinegar (optional)
  • salt & pepper to taste

Procedure:

  1. Place the bacon in a cold sauté pan and turn the heat to medium. This will render the fat slowly and crisp the bacon.
  2. Once the bacon is cooked, remove it from the pan and add the chopped onion.
  3. Cook for about 4 minutes before adding the garlic and mushrooms.
  4. Sauté until cooked through, add the kale and toss to mix.
  5. Add the wet ingredients, wilting the kale and deglazing the pan; cover to steam the kale for 2-3 minutes.
  6. Uncover and toss to continue cooking another 1-2 minutes.
  7. Remove from the heat, garnish with the bacon bits and enjoy!

What’s your favorite vegetable? Share in the comments below. Follow me on Twitter for more delicious recipes.

Keto Italian Style Turkey Meatballs

I had a full weekend of keto experimentation which culminated with an incredible ad-hoc recipe that must be documented and shared with the world. Since I’ve gone keto, I’ve been eating a lot of red meat and I wanted to lighten things up a little, so I picked up some organic ground turkey. Usually I make turkey meatloaf, but I had a vision of Italian style meatballs on fat head flat bread, so I got out the Cuisinart and went to town.

The mushrooms are the secret ingredient in this recipe, acting both as a binder and a hydrating ingredient, keeping the turkey from drying out. The key is chopping and cooking them first. I like the Cuisinart for this, but you could easily chop them by hand for an even smoother affect.

Ingredients:

  • 1.5 pounds of organic ground turkey
  • 2 T + 2T butter
  • 10 crimini mushrooms, de-stemmed
  • 1/2 onion, quartered
  • 1 c almond flour
  • 2 eggs
  • 2 T dried Italian herb blend
  • 1 T granulated garlic
  • 2/3 bag organic frozen spinach, slightly thawed
  • 1.5 c grated Parmesan
  • salt and white pepper
  • 2, 14 oz cans of organic tomato sauce
  • 2 T dried Italian herb blend
  • 1T granulated garlic
  • salt and white pepper to taste

Procedures:

  • Throw the mushrooms and onion in the Cuisinart and pulse about 10-15 times to get a rough chop on them.
  • Cook the mixture with 2 T of butter melted a hot sauté pan for 5-7 minutes until soft. Place in a bowl and set aside in the freezer to cool quickly.
  • Meanwhile, in a large mixing bowl, add the ground turkey, almond flour, eggs, herb blend, garlic, spinach and Parmesan.
  • Add the mushroom/onion mix and use hands to incorporate (don’t forget to remove your rings first!), rolling into 1/2 c size balls.
  • Turn on a sauté pan to medium/high and wait for the pan to heat up. Add 2 T of butter.
  • Place the meatballs in the pan without overloading them (depending on the pan, you should be able to fit 8 meatballs at a time.
  • Brown the first side for 5 minutes and gently turn using tongs.
  • While the meatballs cook, start a pot with the 2 cans of sauce, herbs and garlic on med-low.
  • Once the meatballs have been browned on all sides, drop them gently into the sauce and allow to cook on med-low for another 20 minutes, once the sauce has boiled.

These are the best meatballs I’ve ever made, hands down, and I just threw them together without a recipe. Please let me know what you think of this recipe in the comments below, or follow me on Twitter for more delicious recipes.

Mousse au Chocolat

Friday is finally here. I don’t know about you, but this has been a heck of a week. I’m ready to kick back and enjoy a nice movie before the weekend activities ensue. Before I do, I had to share about the exciting keto recipe I made this week: Keto Chocolate Mousse. Un. Believable. I found an ingredient called allulose online and decided to try it with some unsweetened chocolate. Genius. Pure, dark, delicious genius!

So far, I’ve tried monk fruit (both golden and white granular), erythritol, and finally allulose as sugar replacers. I’ve always hated the taste of the conventional sweeteners and cut myself off from sweetening my coffee maybe 15 years ago. I do like a lot of cream, though! This dessert can be enjoyed for breakfast lunch or dinner because it’s absolutely sugar free! It’s got everything you need to make the worst days go by more quickly; and I have personally tested this.

Someday I’ll calculate the nutritionals on my recipes, but today is not that day. It’s Friday night and I’m ready to RELAX. But don’t you worry, I’ll be making some delicious keto goodies on my weekend off… On my list are: raspberry gummy bears, blackberry waffles, fat head flat bread meatball sandwiches and who knows what else! Actually, that sounds like enough to get me through the first half of next week, too!

Keto Chocolate Mousse

Ingredients:

  • 5 eggs, separated
  • 1/2 t cream of tartar
  • 3 oz unsweetened chocolate – Guittard’s is my all time favorite brand
  • 1 T + 3 T sweetener – I used allulose
  • 1 t collagen powder
  • 1/2 c coconut milk – Aroy-D is the best
  • 1 t vanilla
  • 1 c. heavy cream

Procedure:

  • Prepare 8 ramekins – on parchment, in a baking dish, for easy cleanup.
  • Whip the cream to soft peaks with 3 T sweetener – set aside in the fridge.
  • In a heavy bottomed pot, melt the chocolate on low, adding 1 T if sweetener once melted.
  • Whisk in the egg yolks, one at a time.
  • Whisk in the collagen, stirring until incorporated
  • Whisk in the coconut milk, continue to whisk for 2-3 minutes on low, scraping the bottom yo be sure to not burn the chocolate.
  • Remove from the heat and cool, stirring every few minutes while you whip the cream.
  • In a clean mixing bowl, whip the egg whites on medium high until frothy; add the cream of tartar. Continue whipping until firm peaks form.
  • With a large rubber spatula, fold the chocolate mixture into the egg whites in three separate batches, incorprating the chocolate every time.
  • Fold in 3/4 of the whipped cream, saving the remaining for the top.
  • Garnish with berries and the remaining cream.
  • Enjoy!

Please take the time to leave me a comment below or join me on Twitter for more keto friendly recipes. 🙂

Sick Day Soup

Being sick is the worst. Being sick on your birthday? The infinite WORST. My poor daughter spent the holiday weekend with the stomach flu. Her 17th birthday is today and she’s home recovering from her weekend of horror. She hasn’t eaten solid food in a few days and all she wants is my special sick day soup I made her (and forced her to eat) all weekend. It’s my take on a Chinese style broth with mild seasoning, tons of ginger and a touch of tamari.

This is another perfect time to make bone broth; it’s nutrient dense and filled with all the good things. There’s science behind why we ‘prescribe’ chicken soup for illness, but what’s truly comforting is the the warm, nourishing broth. It just seems to sit well when nothing else will. Now, I’m certainly not a doctor, but I am a mom, and I’m all about holistic home remedies. Even though I take great precautions to avoid illness, every once in a while one of us succumbs to illness.

This recipe can be enjoyed at anytime – you don’t have to suffer from an illness to enjoy the simple goodness of a broth based soup. In fact, this is a go-to weeknight meal for us. Before we went keto, we would frequent our local Vietnamese noodle house for deliciously satisfying pho on a weekly basis. This rustic soup has large slices of ginger for chewing and settling unruly tummies. I serve my patients the broth of this soup if nothing solid is staying down.

Ingredients:

  • 1 qt bone broth or chicken stock
  • 1 inch cube of ginger, peeled and sliced thin
  • 4 green onions, root end removed
  • 1 leek, split, rinsed and sliced thin
  • 3 baby bok choy, quartered and rinsed
  • 1 cooked chicken breast
  • 1 dash of tamari sauce

Procedures:

  • In a 4 qt pot, bring the broth to a boil on medium/high.
  • Add the sliced ginger, green onions and leek to the boiling water and allow to simmer for 5 minutes.
  • add the bok choy and chicken, simmering for another 5 minutes.
  • Turn off the heat and splash some tamari in to taste.
  • Serve immediately.

Of course this soup could be spruced up with quartered mushrooms, cilantro, lemon grass and even sriracha; but for surviving the stomach flu, I keep things as simple as possible.

I hope this message finds you well (or at least better than my poor kid). Please follow me on twitter if you haven’t already.